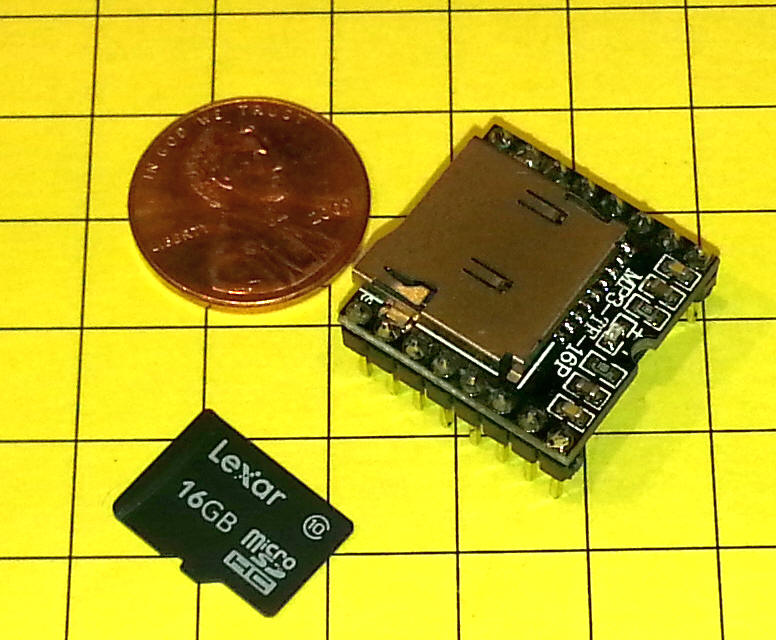
| I have been experimenting with a small MP3 player that is available
THIS ITEM
APPEARS TO BE DISCONTINUED BY THIS VENDOR My first project with this module was to build a talking temperature device using an Arduino Pro Mini.
|
||
|
A video demonstration is here: https://www.youtube.com/watch?v=7viPUfa-uXk&feature=youtu.be
|
||
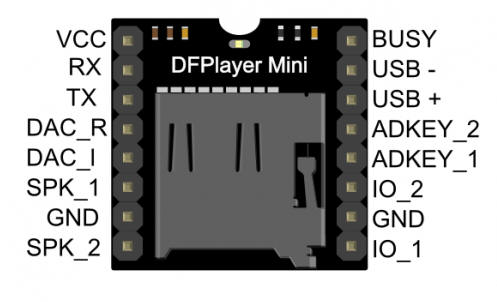
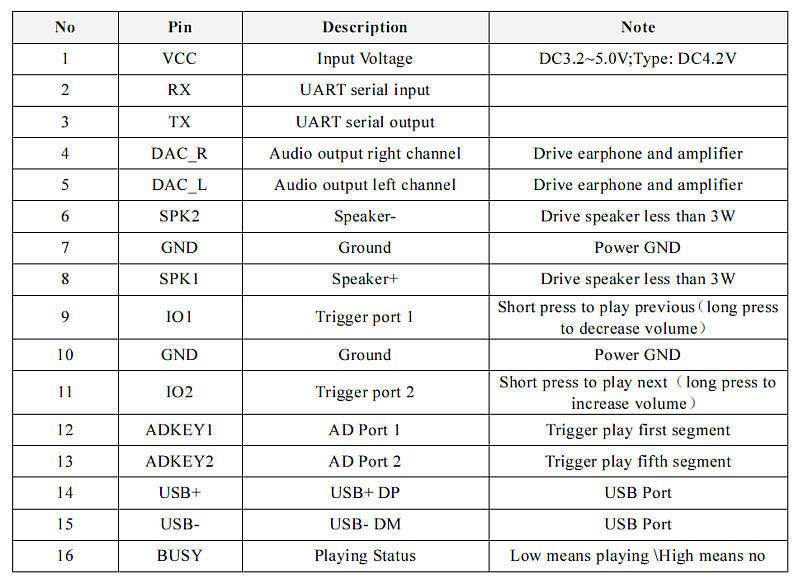
| The MP3 Module The MP3 player is shown here along with the pin descriptions. It operates on 5 volts and is controlled via the RX & TX pins. There are two speaker outputs, one (labeled SPK_1 & SPK_2) can drive an 8 ohm speaker directly, The other output is line level and supplies stereo sound. For this output use GND, DAC_R and DAC_L. Complete information on the MP3 module is here: Arduino/MP3Sound/TalkingTemperature/FN-M16P Embedded MP3 Audio Module Datasheet.pdf The Arduino library that I used to communicate with the module is here: Arduino/MP3Sound/TalkingTemperature/DFPlayer-Mini-mp3-master.zip I also found good information on setting up the unit here: http://forum.arduino.cc/index.php?topic=241021.15#main_content_section and here: http://translate.google.com/translate?u=http%3A%2F%2Famperka.ru%2Fproduct%2Fdf-player-mp3-module&hl=en&langpair=auto|en&tbb=1&ie=UTF-8 (translated to English)
|
||
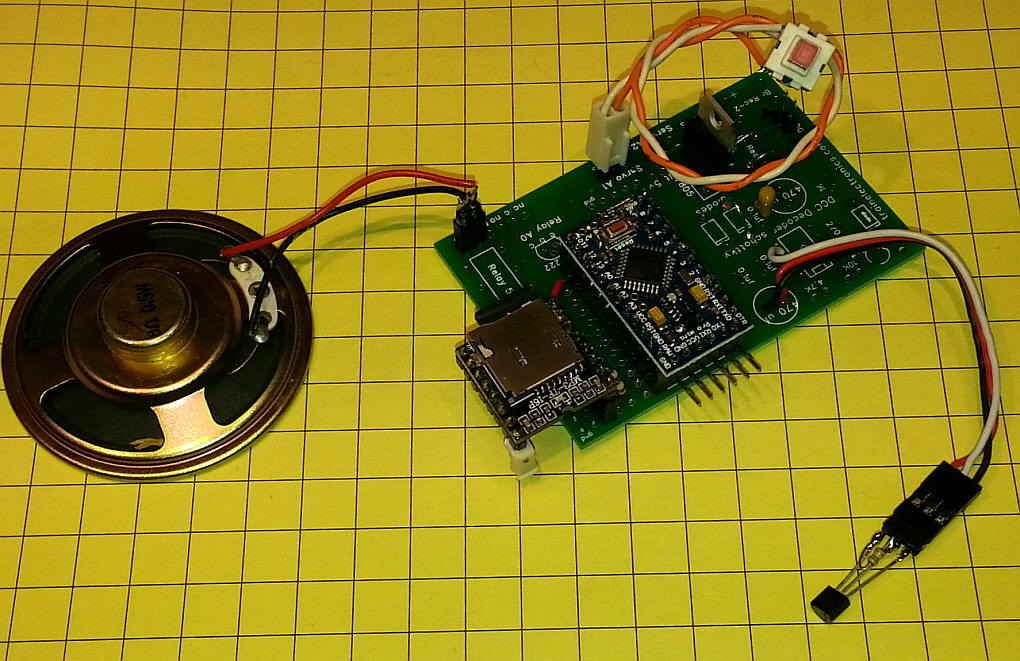
| Connections While the board can be connected to a number of different Arduino versions I chose to use the Pro Mini as I wanted the completed unit to be fairly small. The Mini and the MP3 board run on 5 volts which is supplied by the 7805 voltage regulator. The connections to the MP3 board include the TX, RX and BUSY pins. The 1K resistors on the RX / TX connections are not absolutely necessary but are recommended. The temperature sensor (DS18B20) connects to +5, ground and pin 2. A 4.7 K ohm resistor goes from the sensor's output pin to +5 volts. A push button switch is connected to pin 3 and is used to trigger a spoken temperature report. Note that the pin is held low by a 10K resistor until the button is pressed. The schematic shows the connections. If the Uno is used the voltage regulator section of the circuit is not needed. I connected an 8 ohm speaker to pins SPK_1 and SPK_2. A good speaker supplies more than enough volume for testing and many other applications.
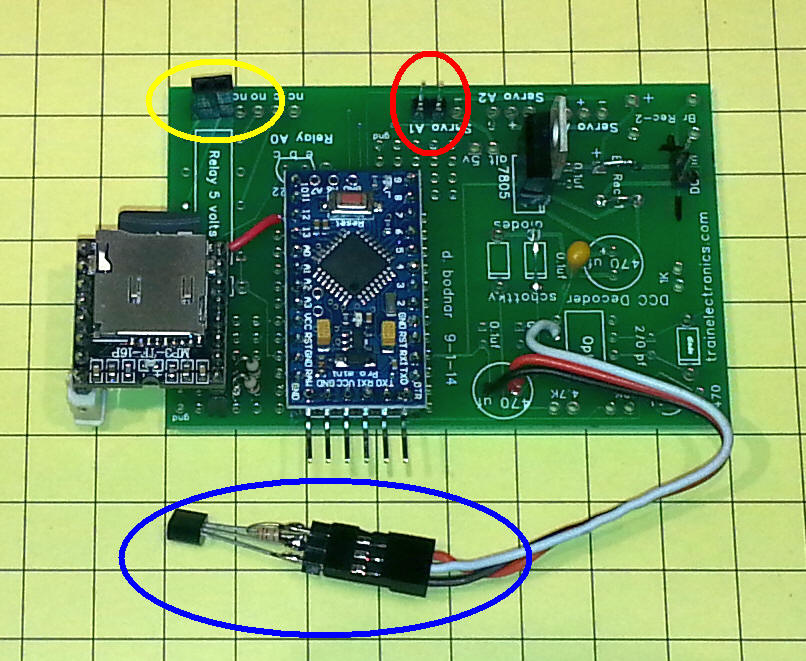
The board that I used to build the test unit is one that I designed and had fabricated for a model railroad DCC project (see: http://www.trainelectronics.com/DCC_Arduino/Decoder_board/index.htm . Many of the DCC specific parts of the board. The MP3 module doesn't quite fit on the board and extends a bit to the side. The speaker connection is circled in yellow, the button connection in red and the temperature sensor in blue.
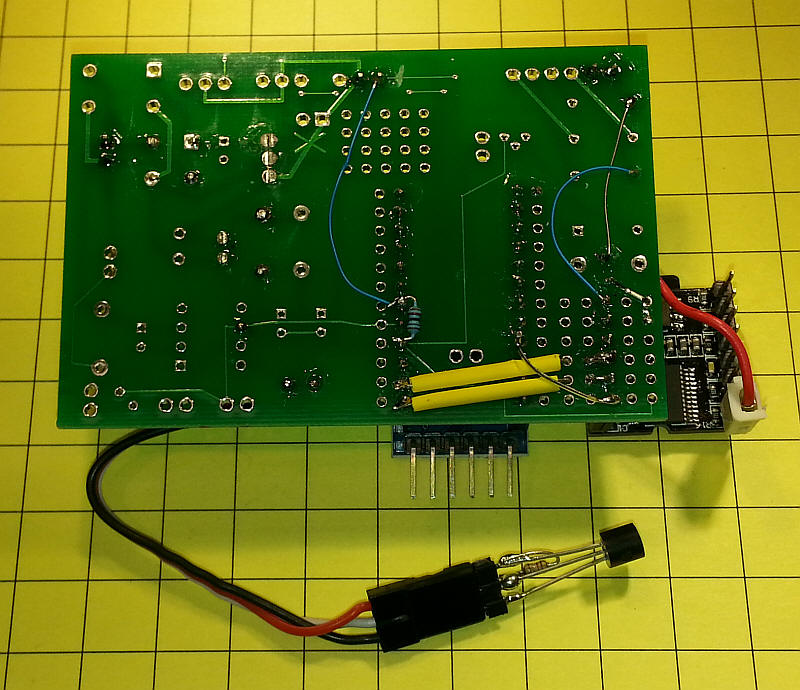
A bit of rework was necessary on the back of the board. The red wire in the lower left connects to the BUSY pin on the MP3 module and pin 10 on the Arduino.
The bare board is shown here:
|
||
|
Sound Files The MP3 files include the numbers 1-9, zero, and the words point, degrees and Fahrenheit. The files are named 0001.mp3--0009.mp3 for the digits 1-9, 0010.mp3 for zero, 0011 for decimal, 0012.jpg for point, 0013.jpg for degrees, 0014.jpg for Fahrenheit and 0015 for Celsius. The files that I used are here: Arduino/MP3Sound/TalkingTemperature/Numbers-etc.zip The original files with more descriptive names are included, too, but all that is needed in the mp3 directory are the numbered files. If your files don't play in the expected order you may need to use the utility DriveSort, found here: http://www.anerty.net/software/file/DriveSort.php - it will reorder the files in a manner that should have them work as named them. They need to be placed on the microSD card in a directory called mp3 and named as shown here:
|
||
| Software The Arduino software requires a few libraries to be installed. These include the MP3 library and the DS18B20 temperature sensor library. IMPORTANT: There are also a number of other libraries and routines that are included in this code that are there for the next project, that of building a model railroad defect detector. You can ignore the LCD display references and those for the lasers and photo transistors. None of these items needs to connected to have the temperature reading program work properly. To activate speaking temperatures make sure that the button attached to pin 3 is closed. There are also a number of Serial Terminal debugging statements that will display status information on the Serial Monitor. file name: DFPlayer_MP3_AudioFileTest_Only_v2 /*
d. bodnar
1-5-15
WORKING with decimal speaking of F temperature
*/
#include <SoftwareSerial.h>
#include <DFPlayer_Mini_Mp3.h>
#include <Wire.h>
#include <LCD.h>
#include <LiquidCrystal_I2C.h>
#define I2C_ADDR 0x27 // <<----- Add your address here. Find it from I2C Scanner
#define BACKLIGHT_PIN 3
#define En_pin 2
#define Rw_pin 1
#define Rs_pin 0
#define D4_pin 4
#define D5_pin 5
#define D6_pin 6
#define D7_pin 7
#include <OneWire.h>
#include <DallasTemperature.h>
#define ONE_WIRE_BUS 2
#define TEMPERATURE_PRECISION 9
OneWire oneWire(ONE_WIRE_BUS);
DallasTemperature sensors(&oneWire);
int numberOfDevices; // Number of temperature devices found
DeviceAddress tempDeviceAddress; // We'll use this variable to store a found device address
int value = 0; //
float xtemp=0;
int potPin = A3; // select the input pin for the potentiometer
int potValue = 0; // variable to store the value coming from the pot
byte buffer[10];
LiquidCrystal_I2C lcd(I2C_ADDR,En_pin,Rw_pin,Rs_pin,D4_pin,D5_pin,D6_pin,D7_pin);
char buf[12];
const int buttonPin = 3; // the number of the pushbutton pin
const int ledPin = 13; // the number of the LED pin
int buttonState = 0; // variable for reading the pushbutton status
int buusyPin = 10;// buusyPin = 10; // sound player busy
int bsy = 0;
int z=0;
int PTState;
int Laser = 11; // laser control
int PhotoTransistor = 9;
int PTState2;
int Laser2 = 12; // laser control
int PhotoTransistor2 = 8;
long tempF=0;
char tempFString(12);
String thisString(12);
//
void setup () {
pinMode(Laser, OUTPUT);
pinMode(PhotoTransistor, INPUT);
pinMode(Laser2, OUTPUT);
pinMode(PhotoTransistor2, INPUT);
pinMode(buusyPin, INPUT);
pinMode(ledPin, OUTPUT);
pinMode(buttonPin, INPUT);
Serial.begin (9600);
// 30 good for unpowered speaker - requires power off to reset volume
lcd.begin (16,2); // <<----- My LCD was 16x2
lcd.setBacklightPin(BACKLIGHT_PIN,POSITIVE);// Switch on the backlight
lcd.setBacklight(HIGH);
lcd.home (); // go home
lcd.print(" MP3 Player");
delay(200);
lcd.setCursor(0,1);
lcd.print(" Version 4.4XXX ");
delay ( 500);
lcd.home (); // go home
lcd.clear();
lcd.print("trainelectronics");
delay(100);
lcd.setCursor(0,1);
lcd.print(" 2015 d. bodnar");
delay ( 500);
mp3_set_serial (Serial); //set Serial for DFPlayer-mini mp3 module
mp3_reset();
delay (400);
mp3_set_volume (30); // 15 is low for unpowered speaker
delay (400);
sensors.begin();
numberOfDevices = sensors.getDeviceCount();
if (sensors.isParasitePowerMode()) Serial.println("ON");
else Serial.println("OFF");
for(int i=0;i<numberOfDevices; i++)
{
if(sensors.getAddress(tempDeviceAddress, i))
{
printAddress(tempDeviceAddress);
sensors.setResolution(tempDeviceAddress, TEMPERATURE_PRECISION);
}
else{
}
}
sensors.requestTemperatures(); // Send the command to get temperatures
printTemperature(tempDeviceAddress); // Use a simple function to print out the data
}
void loop () {
digitalWrite(Laser, HIGH);
delay(10); // wait for a bit
PTState = digitalRead(PhotoTransistor);
//Serial.print(" ");
//Serial.print(PTState);
//Serial.print(" ");
digitalWrite(Laser2, HIGH);
delay(10); // wait for a bit
PTState2 = digitalRead(PhotoTransistor2);
//Serial.println(PTState2);
if(PTState == 1 && PTState2 ==1){
digitalWrite(ledPin, HIGH);
}
else {
digitalWrite (ledPin, LOW);
}
potValue = analogRead(potPin);
//Serial.print("pot= ");
//Serial.println(potValue);
buttonState = digitalRead(buttonPin);
lcd.home (); // go home
lcd.clear();
lcd.print(" Output");
lcd.setCursor (8,0);
lcd.print(xtemp);
//Serial.print(" From Convert Routine Temp F: ");
//Serial.println(xtemp); // Converts tempC to Fahrenheit
int xtemp2 = xtemp * 100;
int xtempWhole = xtemp2 / 100;
int xtempDecimal = xtemp2 - (xtempWhole * 100);
//Serial.print(" AGAIN.....From Convert Routine Temp F: ");
//Serial.print(xtempWhole); // Converts tempC to Fahrenheit
//Serial.print(".");
//Serial.println(xtempDecimal);
String tempFStringW = itoa((xtempWhole), buf, 10);
String tempFStringD = itoa((xtempDecimal), buf, 10);
String thisString = tempFStringW + "." + tempFStringD;
//Serial.print(" ONCE AGAIN.....From Convert Routine Temp F: ");
//Serial.println(thisString); // Converts tempC to Fahrenheit
//Serial.println(thisString);
int lgth = thisString.length();
//Serial.println(thisString.length());
//Serial.println(lgth);
//Serial.println("start");
if(buttonState==0){
Serial.println("SKIPPING!!!");
}
else {
for (int i=0; i <= lgth-1; i++){
int say = (thisString.substring(i,i+1)).toInt();
Serial.println(thisString.substring(i,i+1));
String isDecPoint=(thisString.substring(i,i+1));
Serial.print("saying ");
Serial.print(isDecPoint );
delay(100); // needed to prevent audio "pops" at start
if(isDecPoint=="."){
delay(200);
mp3_play(12);
delay(200);
}
else if (say == 0 ){
mp3_play(10); //zero
}
else{
mp3_play(say);
}
dlayPrint();// delay(1200);
lcd.setCursor(0,1);
}
mp3_play(13); //degrees
dlayPrint();
mp3_play(14); //fahrenheit
dlayPrint();//delay (1200);
}
sensors.requestTemperatures(); // Send the command to get temperatures
for(int i=0;i<numberOfDevices; i++)
{
if(sensors.getAddress(tempDeviceAddress, i))
{
printTemperature(tempDeviceAddress); // Use a simple function to print out the data
}
}
}
// routine to stay here till busy pin goes low once then goes high after speech item completes
void dlayPrint()
{
int bsyflag=0;
Serial.println(" ");
Serial.print("buusypin ");
for( z=0; z<=300; z++){
bsy = digitalRead(buusyPin);
Serial.print(bsy);
delay(20);
if (bsyflag==1 && bsy==1){
break;
}
if(bsy==0){
bsyflag=1;
}
}
Serial.println(" ");
Serial.println("done");
}
// function to print a device address
void printAddress(DeviceAddress deviceAddress)
{
for (uint8_t i = 0; i < 8; i++)
{
if (deviceAddress[i] < 16) Serial.print("0");
Serial.print(deviceAddress[i], HEX);
}
}
// function to print the temperature for a device
void printTemperature(DeviceAddress deviceAddress)
{
float tempC = sensors.getTempC(deviceAddress);
Serial.print("Temp C: ");
Serial.print(tempC);
Serial.print(" Temp F: ");
Serial.println(DallasTemperature::toFahrenheit(tempC)); // Converts tempC to Fahrenheit
xtemp = DallasTemperature::toFahrenheit(tempC);
lcd.setCursor (8,0);
lcd.print(xtemp);
}
|
||
|
Program to test audio files Once the MP3 files have been created and saved on the micro SD card in a directory called /mp3 this program can be used to speak each file in order. It outputs its progress to both the LCD (optional) and serial monitor - I find that I sometimes have to hit the reset button on the Arduino one or several times to get the sound card to initialize the first time - if a "click" from the speaker is heard upon reset or initialization the device will talk. Note that the program is set to read 25 files in this line: for (int zz=1; zz<=25; zz++) /*
d. bodnar
1-12-15
Program to test audio files - must be in /mp3 directory with 4 digit names ie: 0001.mp3, 0012.mp3 etc
*/
#include <SoftwareSerial.h>
#include <DFPlayer_Mini_Mp3.h>
#include <Wire.h>
#include <LCD.h>
#include <LiquidCrystal_I2C.h>
#define I2C_ADDR 0x27 // <<----- Add your address here. Find it from I2C Scanner
#define BACKLIGHT_PIN 3
#define En_pin 2
#define Rw_pin 1
#define Rs_pin 0
#define D4_pin 4
#define D5_pin 5
#define D6_pin 6
#define D7_pin 7
LiquidCrystal_I2C lcd(I2C_ADDR,En_pin,Rw_pin,Rs_pin,D4_pin,D5_pin,D6_pin,D7_pin);
char buf[12];
int buusyPin = 10;// buusyPin = 10; // sound player busy
int bsy = 0;
int z=0;
void setup () {
Serial.begin (9600);
// 30 good for unpowered speaker - requires power off to reset volume
lcd.begin (16,2); // <<----- My LCD was 16x2
lcd.setBacklightPin(BACKLIGHT_PIN,POSITIVE);// Switch on the backlight
lcd.setBacklight(HIGH);
lcd.home (); // go home
lcd.setCursor(0,0);
lcd.print("Audio File Test");
mp3_set_serial (Serial); //set Serial for DFPlayer-mini mp3 module
mp3_reset();
delay (400);
mp3_set_volume (30); // 15 is low for unpowered speaker
delay (400);
delay(1000); // may be needed for initialization of sound
}
void loop () {
for (int zz=1; zz<=25; zz++) //set to read 25 files aloud
{
Serial.print(zz);
Serial.print(" ");
lcd.setCursor(0,1);
lcd.print("File: ");
lcd.print(zz);
lcd.print(" ");
mp3_play(zz); //degrees
dlayPrint();
delay(1000);
}
}
// routine to stay here till busy pin goes low once then goes high after speech item completes
void dlayPrint()
{
int bsyflag=0;
Serial.println(" ");
Serial.print("busypin ");
for( z=0; z<=100; z++){
bsy = digitalRead(buusyPin);
Serial.print(bsy);
delay(20);
if (bsyflag==1 && bsy==1){
break;
}
if(bsy==0){
bsyflag=1;
}
}
Serial.println(" ");
Serial.println("done");
}
|
||