Tools, Tips & Tricks
revised d. bodnar  04-04-2018

Over more than 50 years of tinkering & experimenting with electronics and related disciplines I have developed a number of techniques and identified an array of tools that I use every day.

This web page is an attempt to document such tools, tips & tricks in hopes that it may benefit others.


Tools
 
Electric Screwdrivers

Large electric drill / screwdrivers are quite common.  Not so common are small electric screwdrivers that are meant to remove small, fine threaded screws or bolts that hold all of our electronic devices together.

I have found two small electric screwdrivers that I use on a daily basis.

The XIAOMI Wowstick is available from Banggood.com with 18 bits for about $20.00.
It can also be found on
Amazon and other places with fewer bits.  Prices vary a great deal so shop around.

The screwdriver is powered by two AAA batteries and has a forward / reverse switch on the body.  There is an LED light on the tip that nicely illuminates your work area.

While the Wowstick is very nice it pales by comparison to the electronic ES120.  This screwdriver is not only rechargeable but it is reprogrammable to take on different characteristics from the original.  It also has an accelerometer that automatically turns the screwdriver bit in the direction your hand is turning at a speed that is determined by the rate which you turn you hand.  The bright OLED display shows its mode of operation and the battery charge.

The cost for such capability and high quality is steep, around $100.00.  It is available from Amazon and Banggood which has it right now for about $90.00


There is a nice comparison of the two on YouTube.  

If you are looking for a nice array of bits without the cost of the power units just described Amazon has an excellent manual screwdriver with nearly 50 bits.


Reamers

If you ever have made a hole in a control panel or other object that needs to be just a bit larger a reamer might just be what you need.

I have two - one is small and comes with its own case (not a bad idea as it is SHARP!)  Amazon sells it for about $5.00.

 I have used these tools on acrylic and wood.

The other reamer is larger and able to do heavier duty work.  It is also available at Amazon for less than $10.00


Dremel Cutting Wheel

These cut off wheels fit onto a standard Dremel 1/8" arbor and can easily cut through many materials including, acrylic, nails, bolts, wood and other hard-to-cut materials.  This bag of 100 is available from Amazon for around $15.00


Dremel
Flashlight
Parallel Jaw Pliers

These pliers are really handy when you need to grip an item without putting too much pressure at one point.  Since the jaws move parallel to one another an even force is exerted on the item they grip.  They are available from Amazon for around $20.00

Wire Strippers

I have used dozens of different types of wire strippers over the years and have found this design to really work with wire of different sizes.  They are available from Amazon for less than $20.00.

Bench Meter

My bench meter is a fine instrument that gets a workout every day.  It is a Tenma 72-1020 and is available from Amazon, Newark and other vendors for a bit over $200.00

Bench Power Supplies

Right now I have six bench power supplies that are on or near my workbench.  The one I use the most is a KORAD KA3005D that can provide up to 30 volts at 5 amps.  In addition its meters display 1/100 ths of a volt and 1/1000 of an amp.  It is available from Amazon for about $100.00


Laser Cutter

By far my most used and most versatile tool is a laser cutter.  I purchased my first unit for less than $400 from eBay in 2015.  It wasn't the greatest of laser cutters but taught me how they work and gave me a valuable introduction to a new world of fabrication.  In terms of value for the dollar it is one of the best deals around.  These are still available on eBay - just search for 40W laser engraver

About a year after getting the first machine I sold it and replaced it with a 50 watt machine that was MUCH larger and more capable.

Search eBay for 50W laser engraver

Shortly after getting the 50 Watt unit I came across a Kickstarter for a new laser cutter called a GlowForge.  The crowdfunding raised over $27,000,000 in 30 days.  I decided to participate and ordered one, too.  Unfortunately, as is the case with many startups, there were delays.  The good news is that I received my laser cutter from Glowforge in December of 2017, about 2 years after ordering it and it was surely worth the wait! 

Not only is it good looking and well engineered but it is also easier to use than either of the two that preceded it.

Here the GlowForge is in the foreground with the 50 watt cutter behind.

If you do decide to order a GlowForge you can use this link to get a discount.

This invitation link, which is unique just to you, gives your friends access to order a Glowforge Pro for $1,500 off current pricing, for US delivery within 10 days.

https://glowforge.us/niMJeE


3D Printer

I have had three 3D printers and still have two of them - the first is the original printer that I purchased from Afinia - this printer still continues to work well and can be relied upon to make good prints.

The 2nd was a FlashForge Creater with dual print heads - while this was an OK printer it was not as reliable or consistent as the Afinia - I sold it a few years ago.


My 3rd is still my favorite - the Prusa I3 MK2 - it was the winner of the Make Magazine shootout when I purchased and its successor, the Original Prusa i3 MK3 3D printer. won the shootout last year.

Soldering Station / Cleaner

If you are having difficulty soldering it could be due to your equipment.  A good soldering iron can make a world of difference.  A few years ago I found this soldering station at Marlin P. Jones and it is the best I have ever used. 

Not only does it heat quickly, but it has a digital display that allows you to adjust the temperature for different jobs.  For example, I generally keep it set at about 280 degrees C (about 540 F) bit can increase it should I be working on heavy wire or thick objects.  It sells for less than $50 and replacement handles (the heater in them is the only thing that I have ever had fail) sell for about $7.00.

To keep your tip clean don't depend on a damp sponge which will cool the tip and make a mess.  The same seller has spun metal cleaning pads for about $6.00

My preference for solder contains lead - Kester 60/40.  While lead free solder has come a long way I still don't use in from day to day.

Battery Powered Soldering Iron

I have collected a number of battery powered soldering irons and, until now, none were worth much.  The good news is that there are at least three that I have tested and used successfully.

The first is a USB powered (yes, really!) soldering iron.  It actually works but may not find enough power from laptops and tablets - I have been using it with a power bank and it works well.  It is not suited to solder large metal terminals or really large leads but for simple circuit board connections is does the job.

They are available from Amazon and Banggood.

A more serious battery powered soldering iron requires more power.  This one is powered from 12 volts and is available from Amazon and Banggood.

The version here has a plug that fits many radio control model battery packs. 

There is also one that has a cigarette lighter plug for use in cars and another that has two large alligator clips to attach to a car's battery.

My latest acquisition is the most sophisticated of the battery operated soldering irons and the most expensive.  It is made by the same group that did the electronic screwdriver.  It has an OLED display where you can set temperature and other parameters.  It has an accelerometer that detects when it is picked up so that it heats up.  If you put it down it will shut down to a user selected lower temperature after a user selected time.  Very smart!

The TS100 is available from Amazon and other vendors for about $70.  The one I purchased from Amazon came with a plug-in power supply so that you can use it right away.  You can also supply 12 to 24 volts from a battery.


Digital Calipers

I find Harbor Freight's digital calipers to work well and cost very little.  I have been using the same set for many years and all I have to do is replace the battery every few years


Automatic Center Punch

Another great product from Harbor Freight is their automatic center punch.  It is spring loaded and makes a nice indent wherever you want to drill a hole.  Recommended!


Tips
 
Cell Phone Batteries

While Nickel-Cadmium (NiCad) and Nickel-Metal Hydride (NiMH) rechargeable batteries have a place on my workbench I almost always choose to use Lithium Ion cell phone batteries when I need a battery to power something.

NiCad and NiMH cells provide 1.2 volts while Lithium Ion cell phone batteries supply 3.7 volts.  I wire them either singly (3.7 volts), two in series (7.4 volts) or three in series (11.1 volts)

If you choose to give this a try make sure that the battery (actually a cell if you only use one) has a protection board installed.  Such a board protects the cell from being over charged or over discharged.  Either of these extremes can quickly kill the cell and can, in the case of overcharging, present a hazard.

The cells I have been using recently are meant for a Huawei Ascend II cell phone.  Other cell phone batteries work well, too, but I have found these to have a protection board and to be of reasonable cost.  Typically only a few dollars each.

In this photo the covering on the cell has been removed exposing the small circuit board and its components (yellow arrows).

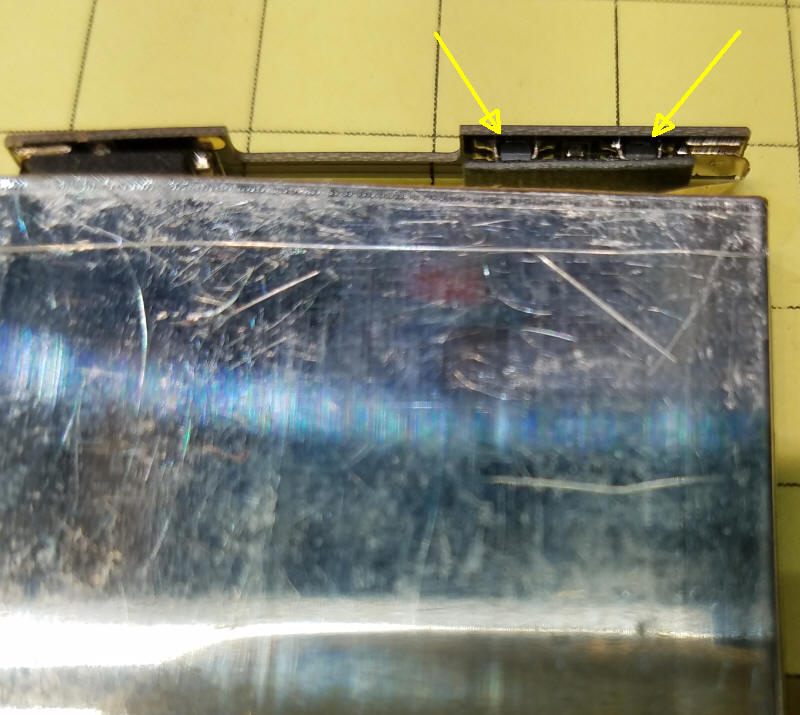
There are three gold terminals at the top.  The one closest to the edge is positive and the inner one is negative.

Here a red wire has been soldered to the positive terminal and a black wire to the negative.

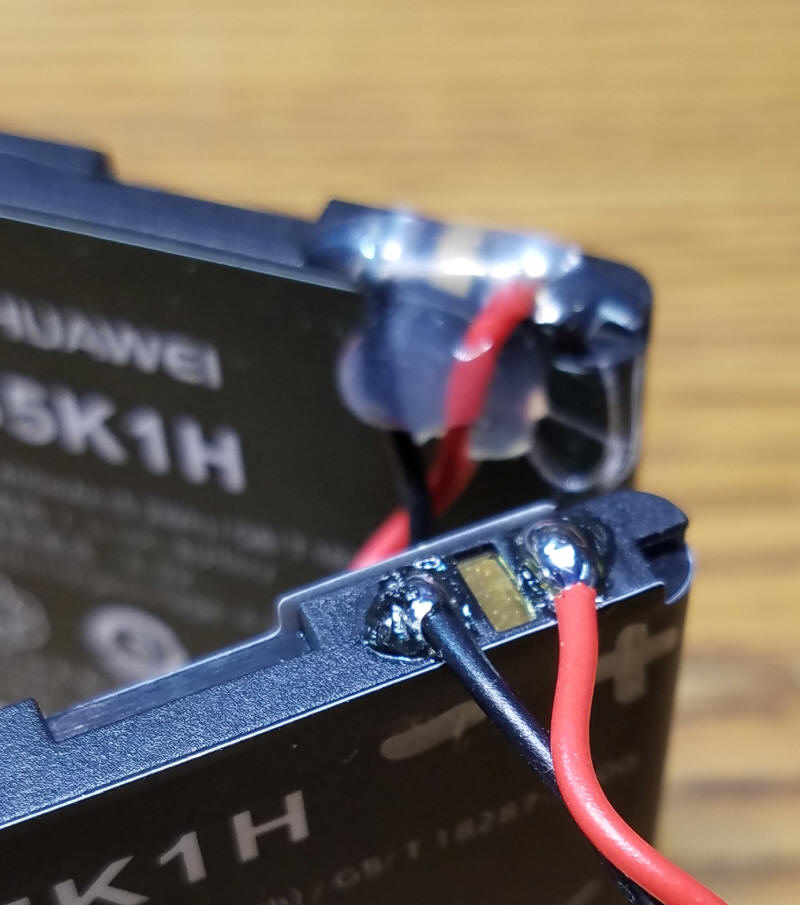
The cell in the background has had its terminals insulated with hot glue.  You can also do this with electrical tape.

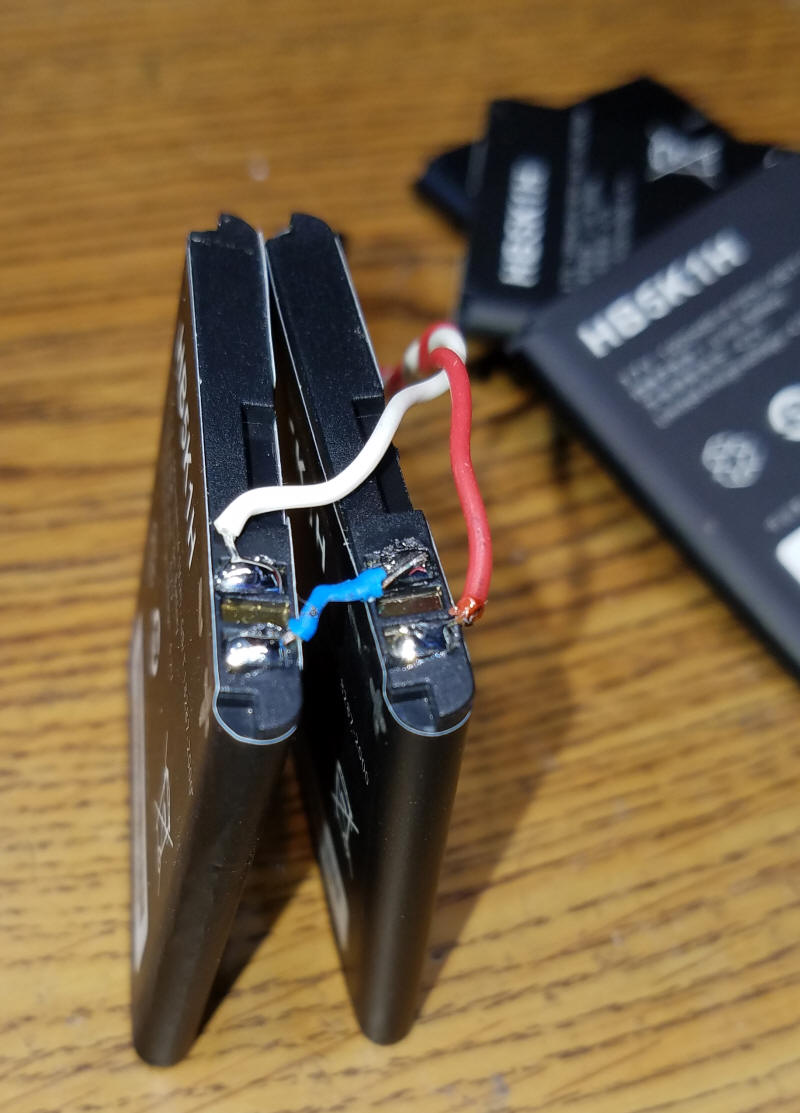
Here two cells have been wired in series to create a battery that supplies 7.4 volts.  Note the blue wire that connects the positive terminal of one cell to the negative terminal of the other.  I have gotten into the habit of using red/white wires for 7.4 volt batteries.

I have wired as many as three cells together providing 11.1 volts.  The wiring is shown here.  Note that there are two jumpers connecting the cells in series.

I charge the single cells with 5 volts DC that I get from an old cell phone charger.  The 7.4 volt batteries can be charged from a wall wart 
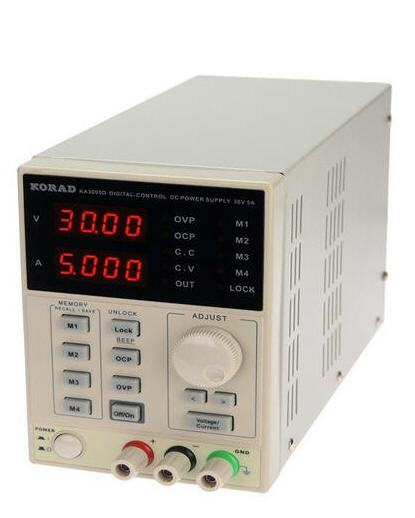
providing 8 or 9 volts DC.  The 11.1 volt batteries are charged from one of my bench power supplies set to charge at 12 volts at 150 ma.

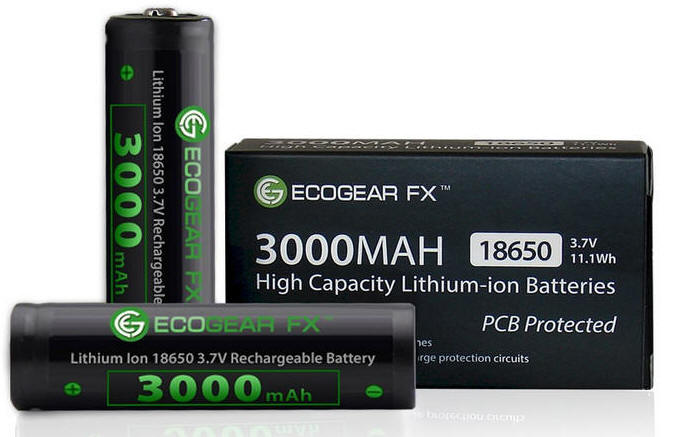
For larger capacity Lithium Ion cells Amazon sells a protected 18650 cell.  They are rated at 3000 mah, more than double the cell phone batteries.  They do not have solder tabs but you can rough up the terminals and solder wires to them if you use a hot iron, lots of flux and get in & out quickly so that you don't heat up the cell.  While soldering directly to lithium cells is not recommended it can be done.

Male & Female 2 Pin Headers

When one works with electronic gizmos you are constantly connecting one unit to another or to power or sensors or displays.  Fortunately I have identified a number of connectors that make such connections easy to make.

The simplest thing I use is a two pin female header attached to two wires.  I was fortunate a few years ago to find a sale on two pin female to female connecting wires for a few cents each.  I bought, literally, thousands!  Here is a sampling

Here is a similar configuration on eBay  They are named "20pcs 2.54mm 20cm Dupont wire cable 2p-2p pin Connector For Arduino Female-Female"  The 2p-2p designation means that pairs of wires attach to the same header.

They are great to connect to male headers on an Arduino or similar board.  Unfortunately it is not easy to join to other female headers or to daisy chain a number of them together.  The good news is that there is another item that takes care of this issue.  Long male header strips that can be cut to two pin sets.  I found them in 40 strip sets on eBay.


More Dupont Connectors

Dupont connectors come in a variety of configurations.  The ones described above are female to female 2p-2p.  Most of the connectors you will find are not 2p but 1p - They are frequently sold in a multi-colored ribbon of 40 joined together.  They can be separated into any grouping rather than using the whole 40 wire array.  This photo shows 40 1p male to male cables.  Such a set sells for only a dollar or two on eBay.  They are also available in male to female cables.  I keep a supply of each of the different configurations on hand.

JST Connectors

Dupont cables are a wonderful value and simplify many connection requirements but they have one major failing, they don't force you to observe polarity if you use them for power connections.  Although I frequently use such cables to connect batteries to circuits I must be ever vigilant that I connect red to red and black to black for power.  Reversing these connections, even for an instant, can kill a component.

JST connectors are red/black wires with connectors that are polarized.  That is they will only go together one way, with red to red and black to black.

They are available on eBay.  Make sure you get both male and female cables.

Bike Tube Rubber Bands

My favorite rubber bands are (usually) free.  I am a cyclist and go through any number of bicycle tubes each year.  I never throw them out but repurpose them.  Sometimes they become clamps when I glue furniture but I most frequently cut them into small rings that make very strong and long-lived rubber bands.  Their black color also tends to blend in with some projects much more nicely than do latex ones.

If you are not a cyclist stop by your local bike shop and ask if you can have a few punctured tubes.  Most shops are happy to accommodate you.

 
Tricks
 
Glue Dots Adhesive

My favorite tip is a type of glue or adhesive that is reminiscent of the goo that is on the back of a credit card when you get it in the mail.  This stuff can be purchased in strips from a company called Glue Dots - they are available from most crafts stores and Amazon.  The ones that I like are shown here.  They are 1 inch lines and are said to be permanent.  I use them for all kinds of jobs where I need to hold something in place for a time or permanently.

Super Glue Accelerator

We all are familiar with super glue (also called CA or cyanoacrylate).  Even though it is frequently billed as an instant bond it can take a minute or more to grab some materials.  This is where super glue accelerator comes in.  This liquid or spray sets super glue as soon as it touches it making it really instant bond!

It is available from many vendors including WalMart and Home Depot.

Car Trim Adhesive

3M makes a clear double sided adhesive that is used for cell phone assembly and for automotive trim attachment.  It is available in assorted widths from eBay.


Little Volt Meters

A hand held or bench multi meter is great for taking measurements but it is often convenient to have  dedicated meter to keep tabs on one device or another.

Inexpensive meters are available that can give a continuous voltage reading.  I use them in many different projects.

They are available from eBay for a few dollars.  Some are two wire devices that get their power for operation from the voltage source they are testing.  Others have three wires and get their operation power from another source.

Jeweler's Loop

When working on small components stronger glasses or magnifying glasses make a big difference but I find that a jeweler's loop held in place in my dyd socket works best, especially when working with surface mount components.

They are available from eBay for a few dollars.  I use the ones that look like this.

LED Resistor Placement

LEDs are one of the most common parts that we use.  Most of the time they require a current limiting resistor to keep them from drawing too much current and burning up. 

I like to mount a 470 ohm or 1K ohm resistor to LEDs that I use on breadboards or for testing.  To simplify identification of an LEDs anode (the lead that gets connected to positive voltage) I always solder the resistor to the anode.