-
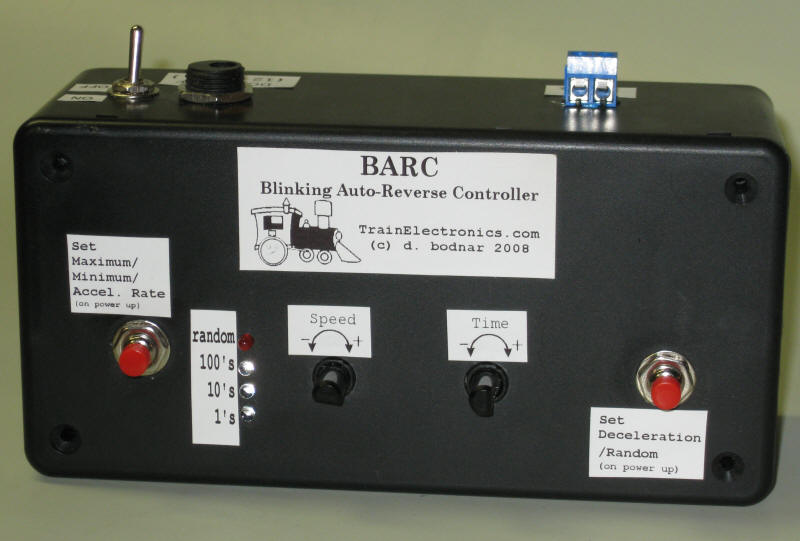
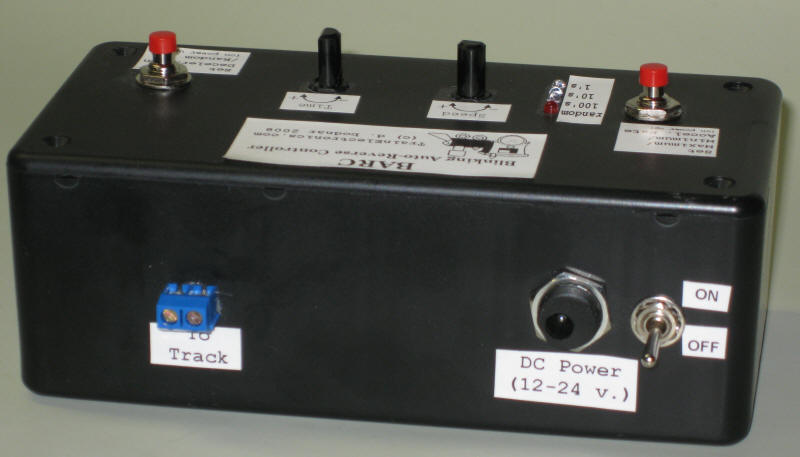
The Blinking Auto-Reverse Controller (BARC) makes running trolleys and other
point-to-point railroad engines a
simple and enjoyable experience -
Even though the
unit was initially called the "Basic" Auto-Reverse Controller its microprocessor brain gives it a host of features in a
small package -
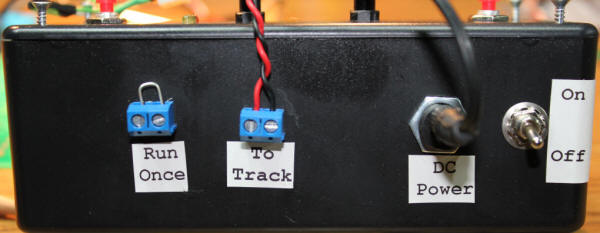
The only connections are to your DC power supply and to the track.
-
Since the BARC controls your
trolley by time you can run it on a point-to-point or loop layout with our
without cut rail and diodes that are normally used at both ends.. -
If you choose
to use the cut rail and diode that such
systems traditionally use at each end
click
here for information on how this works and how to make your own track sections
|
(Although the term "trolley" is used in the notes below the BARC
will work with any small DC powered engine including G, HO, N and TT scales) |
|
|
Features
- You supply
DC power from your power supply to the BARC
- Since the
BARC can control the high and low speed of the trolley power can be supplied
from a fixed output 12-20 volt power supply, such as a
"wall wart"
-
A potentiometer, labeled
"Time", is used to set the
time that the trolley will run between reversals. This time can range from a few seconds
and over 8 minutes.
-
A second potentiometer,
labeled
"Speed", is used to
adjust the high and low speed setting of the trolley
- If
cut track & diodes are used the trolley goes to one end of the track, stops where it enters the diode protected
section and waits until the relay reverses the power
- If
cut track and diodes are not used you can manually set a stop point
where the trolley will stop and wait for the total time that you
selected to expire before it reverses.
- When the
relay reverses the trolley goes to the other end and the process repeats
- A set of 3
LEDs is used to show the time setting and the time remaining as the trolley
runs
- The same
LEDs also show the number of "laps" or reversals that have taken place.
- A fourth
LED indicates whether the running / delay time is always the same or is set to be changed randomly
- A
"deceleration point," where the trolley will begin to slow down, can easily be
set as the trolley is running
|
|
Track Preparation
for Those Using Cut Track & Diodes
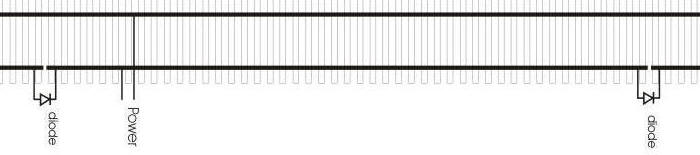
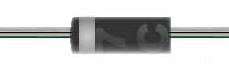
-
Both track sections need to be cut
on the same rail and both diodes must be installed with the same polarity, that
is the band on the diodes must point in the same direction. Note that the
drawing above is for a G scale layout. If you work with HO the diodes must
have their bands pointing in the opposite direction.
|
|
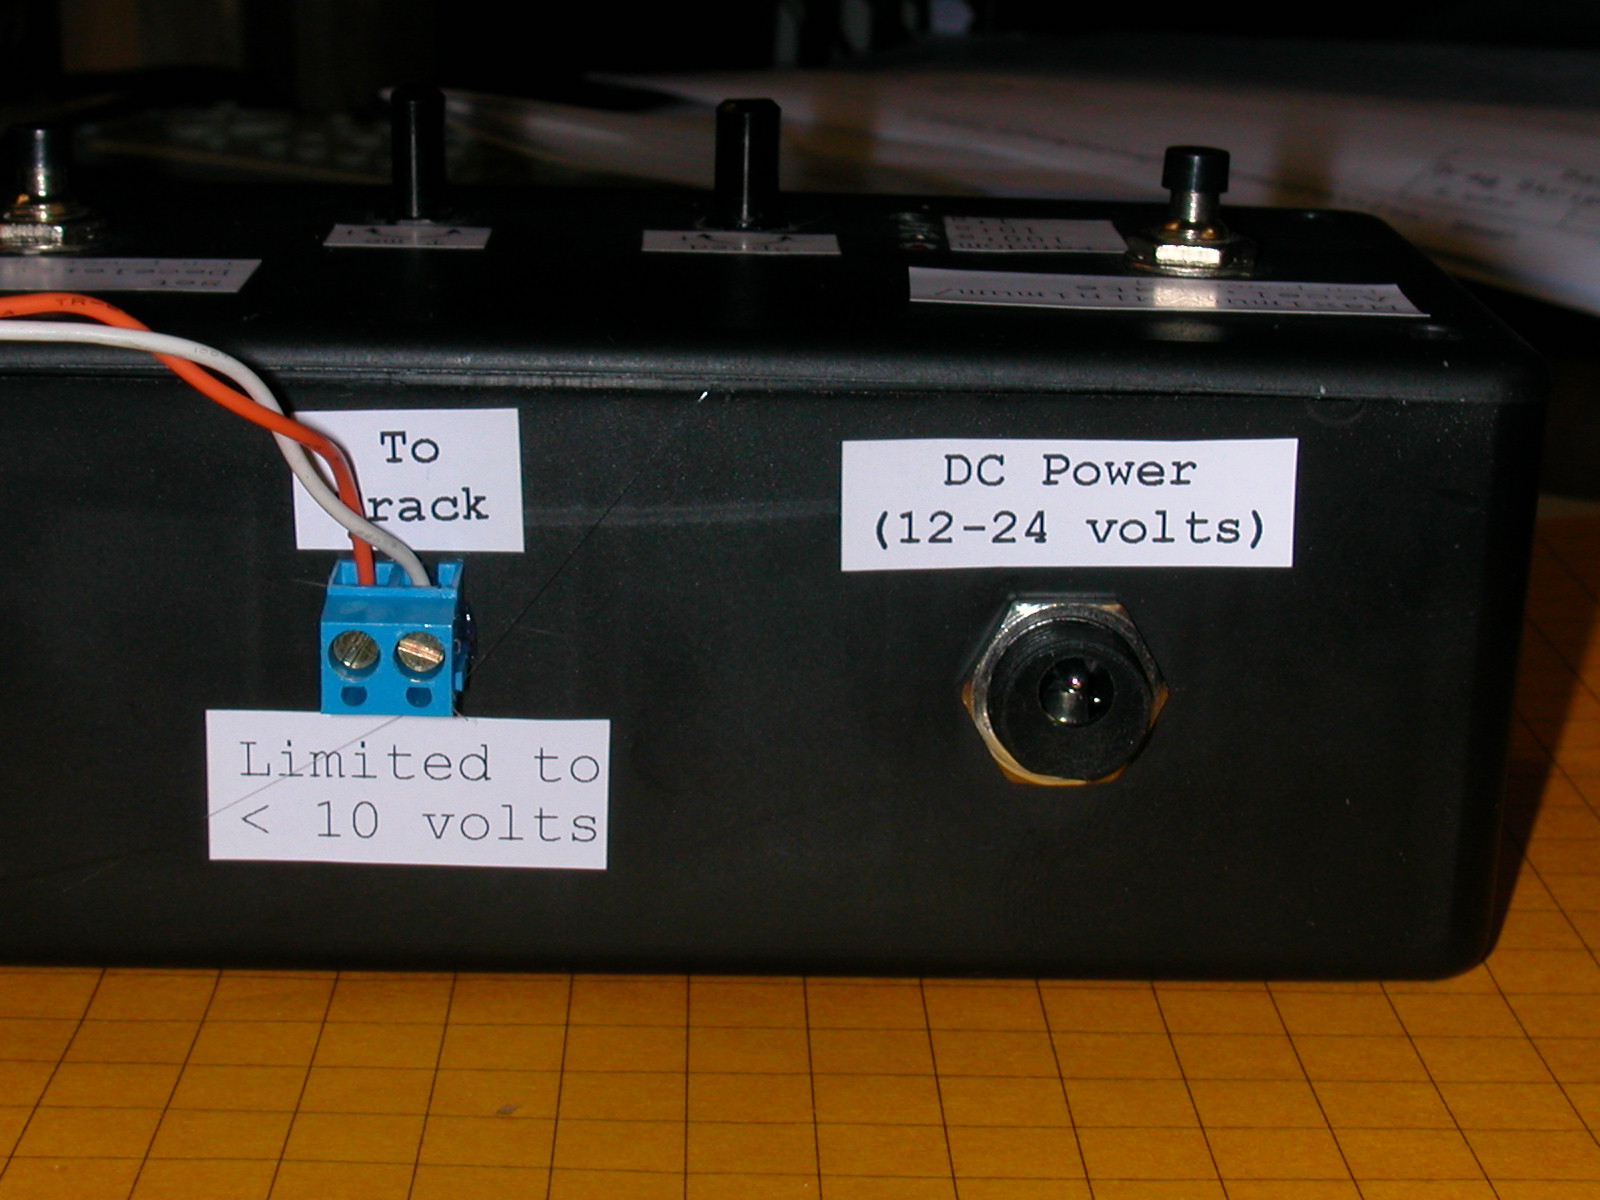
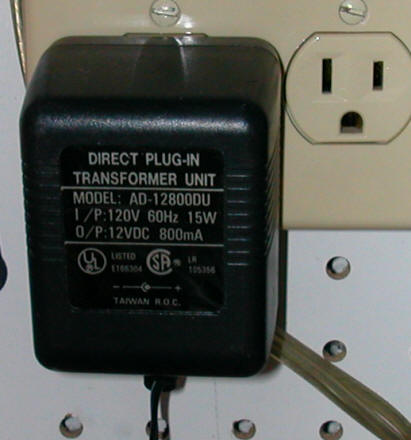
Power Connection
-
Power from your DC train transformer
or power pack
can be connected directly to the power terminals on the board
-
a
minimum of 7 volts is needed for
operation but 12 volts is preferred
- you may use an inexpensive train power pack
or even a DC "wall wart" style power supply
- the maximum speed of the trolley is
determined by both the power output of your power supply and the high speed
adjustment on the BARC
-
The power from your DC power
supply goes to the coaxial connector labeled "DC In"
-
The track is connected to the female
connector labeled "Out"
|
|
Power
Supply Precautions!
|
Setting Maximum & Minimum Speed
- The maximum speed of the trolley is determined by the voltage
supplied to the BARC by your DC power supply.
- In addition you can set the top speed to a lower rate by
following this procedure:
- Place the trolley in the center of the track
- Hold the "Set Max/Min Speed" button when you apply power to the BARC
- The 10's and 100's LEDs will flash. release the "Set
Max/Min Speed" button
- The trolley will begin moving in one direction
- Adjust the speed potentiometer (the one on the left) to increase
(clockwise turn) or decrease (counter clockwise turn) the top speed
- If the trolley comes to the end of the track and stops just
momentarily press the "Set Deceleration" button to reverse the trolley and
continue adjusting
- When you are done adjusting the top speed briefly press the "Set
Max/Min Speed"
button.
- The 10's and 1's LEDs will flash
- Adjust the minimum speed with the Speed pot
- Briefly press the "Set Max/ Min" speed button when done
- The BARC will remember that top speed setting, even after power
is removed, and use that settings until you reset it. Note:
while the trolley is running the low speed setting is
dynamically determined by the position of the Speed pot. that
is, you can move the pot as the trolley runs at its low speed and
either increase or decrease its speed.
|
Setting Acceleration /
Deceleration Rate
- The rate at which the trolley speeds up going from its slowest
to fastest speed and the rate at which it slows down is preset at a
rate that is likely to satisfy most situations
- If you would like to experiment with changing this rate follow this procedure:
- Complete the Set Maximum & Minimum speed as described above
- When done hold the "Set Max/Min Speed" button for
several seconds as the lights flash quickly
- When the flashing stops release the button
- Use the Speed pot to set the rate of acceleration /
deceleration.
- The full counter clockwise position gives a very fast
acceleration / deceleration while the full clockwise position gives
a very slow, gradual rate of change
- The trolley will continuously accelerate & decelerate to show
your selected setting, pausing for1 second at the maximum speed and
again for 1 second at the minimum speed
- Remember that briefly pressing the "Set Deceleration" button
will reverse the trolley should you run out of track
- Briefly press the "Set Max/ Min" speed button when done
- The BARC will remember the rate you have chosen.
|
Setting Time
- When the unit is first turned on the 3 red LEDs flash together
showing the version number of the software. (Version 5.2, for
example, would flash 5 times, pause briefly, then flash 2 times)
- During this flashing you have an opportunity to change the time
setting.
- The speed potentiometer, the one to
the right, makes time adjustments
- Turning the potentiometer counter clockwise decreases the time
and turning it clockwise increases the time
- The time range is from a few seconds to 512 seconds, a bit over
8 1/2 minutes.
- You will note that there is a slight detent, or bump in the
potentiometer movement, that you can feel when you pass the center
point
- If you turn the Speed potentiometer while the LEDs are flashing
out the version, the
LEDs will begin to flash out the time in seconds.
- The LEDs are labeled 1, 10 and 100. To indicate a time of
135 seconds the 100's LED would flash once, the 10's LED three times
and 1's LED five times.
- Each time the potentiometer is moved the time will change the time and
the unit will flash out the new setting.
- If you stop adjusting the potentiometer and allow the new time
to be flashed out three consecutive times the time will be stored
and the unit will start operating.
Note that time can be adjusted at any time during the
BARC's operation by turning the potentiometer a bit either way.
This will put you back in the mode described above. Note:
this feature removed 6-20-06
|
Random Time
- To make the time between reversals
somewhat random hold button 1 for a full second as the unit is
turned on. The red Random LED will light. Repeating this
procedure will turn off the random function.
- The random time is computed using
this formula: 1/2 of the time selected is added to a random
number between 1 and 1/2 of the time selected.
- For example, if the time were set
to 200 seconds the random times would be between 101 and 200
seconds. If 120 were set the random time would be between 61
and 120 seconds.
- Using this formula insures that
your trolley will have enough time to traverse the track before it
reverses since the time is never less than 1/2 of what you have
selected.
|
|
Getting started
-
Install cut / diode equipped track
at each end of the line of track
-
Connect the unit to the
DC output of your power supply.
-
Connect the output of the unit to
the track
-
Place a trolley, small engine or
rail car on the track
-
Turn on the power
-
Adjust the time with
the Time potentiometer
-
After the BARC initializes your
engine will begin its journey in one direction or the other
-
Once it hits an end it will delay,
reverse and continue
|
|
Setting a
Deceleration Point
-
As the trolley
approaches the end of its run you can set a deceleration point where
the BARC will slow the trolley to a lower speed as it enters the
diode protected end of the track and stops
-
Hint: let the
trolley run a few laps before setting the deceleration point.
-
Press and hold the "Set Deceleration" button when you want
the deceleration to begin
-
Release the "Set Deceleration" button once the lights begin
to flash rapidly
-
You can now use the speed potentiometer to adjust
the low speed setting
-
This will be necessary if the speed is set so low
that the trolley stops rather than slows to a crawl
-
Once set the BARC will remember the deceleration
point until you either choose another, earlier deceleration point
-
If you want to do a later deceleration point do a
complete reset first.
|
Time Reported During Timing
- As the BARC operates it flashes out the time remaining until the
trolley is
reversed.
- You may notice that the flashing will frequently skip a second
or two as it reports, for example, 33, 32, 31, 30, etc. This
happens when the time needed to flash out a report exceeds one second.
|
A Note About Time
- The accuracy of the time reported by the BARC is reasonably
precise
- The time between trolley reversals can be off by a few seconds
due to the varying time needed to report the number of laps run and
the time needed to accelerate or decelerate.
|
Laps Completed Report
- Each time the time count reaches zero the BARC reports the
number of times the unit has reversed the trolley. You can
think of this as the number of "laps" that have been completed.
- The report is similar to the time remaining report except that
all 3 LEDs flash before and after the laps report and the report is
flashed out somewhat more slowly than the time remaining report.
- If the number of laps exceeds 999 the counter will continue to
report by flashing the 100's LED correctly. If you are on the
1345 lap, for example, the 100's LED will flash thirteen times, the
10's four times and the 1's five times. If you let it run for
a few weeks it will eventually reset to zero when it gets past 2^16
which equals 65,535!!
|
Complete Reset
- The BARC can be completely reset to
its factory configuration by following this procedure.
- Turn the BARC off
- Hold BOTH the "Set
Deceleration" and "Set
Maximum" buttons down
- Turn on the power to the BARC
- All four LEDs will begin to flash
- Hold the buttons until the LEDs
stop flashing. This takes about 3 seconds
- Release the buttons and all is
reset
- Releasing the buttons before the
LEDs stop flashing will abort the reset
|
An Added Bonus!
- If your computer is equipped with a standard 9 pin serial port
you can see the progress of your BARC and see the total laps
completed by your trolley.
- Receiving reports from the BARC
involves starting a terminal program, like HyperTerminal. Set it to
2400 baud, No parity, 8 bits, and one stop bit. It must also be
set to use COM1 (or whatever com port you prefer) rather than a
modem.
The images
below show how I set up my computer. To get started on a Windows
98, 2000, ME or XP computer click Start then All Programs then
Accessories then Communication then HyperTerminal. If HyperTerminal
is not there you may have to install it. For instructions on how to
do so just search Google for "Install HyperTerminal".
Here is a sample link on how to do the install from IBM's web site.
When you first start HyperTerminal
you must create a new connection. Type a name for the new
connection (I used Com3 9600 BARC) in the Name box.
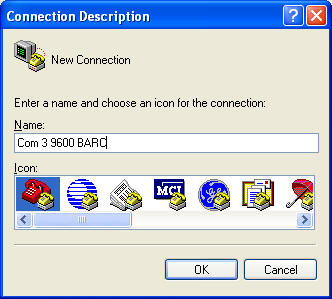
Click OK
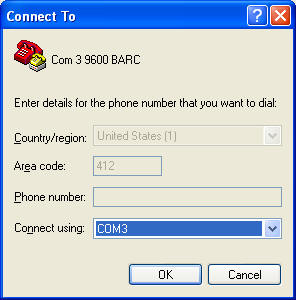
In the Connect To box I selected Com3 - you are more likely to be
using Com1
Click OK
Change the next screen so that it
looks like this:
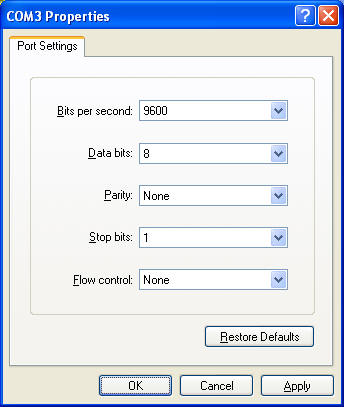
Make sure Flow Control is set to "None"
Click OK
Connect the 9 pin serial plug to your PC's serial
port. The cable is short and may require a serial extension
cable. Plug the 2 pin header into the board where it is
labeled "serial" - make sure the white wire on the connector that
goes to the board goes to the pin marked "-".
If necessary click
on Call / Call to connect to the port. Once connected you
should see information like that show below on your screen.
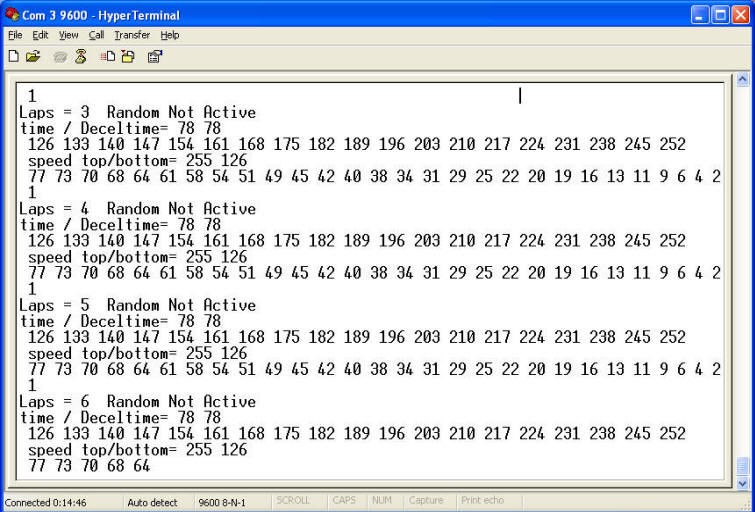
|
.JPG)
.JPG)
.JPG)
.JPG)